

First pull up your TrueNAS, from our last video we created a virtual machine with ubuntu and docker installed on it so if you missed that video go check it out:
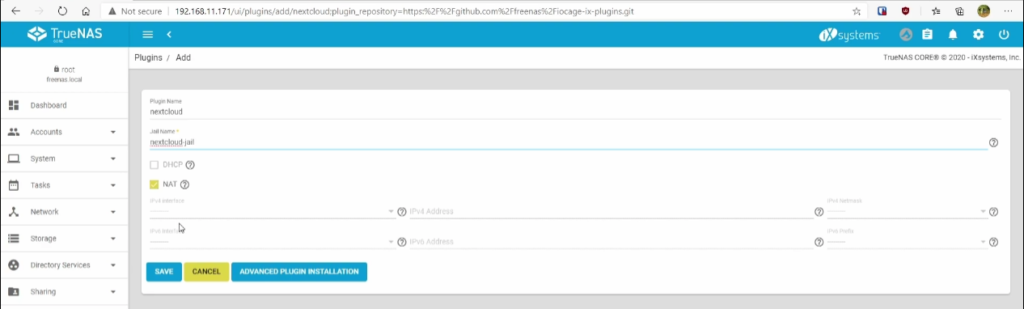
Go to plugins and install Nextcloud, it should only take a few seconds to install.
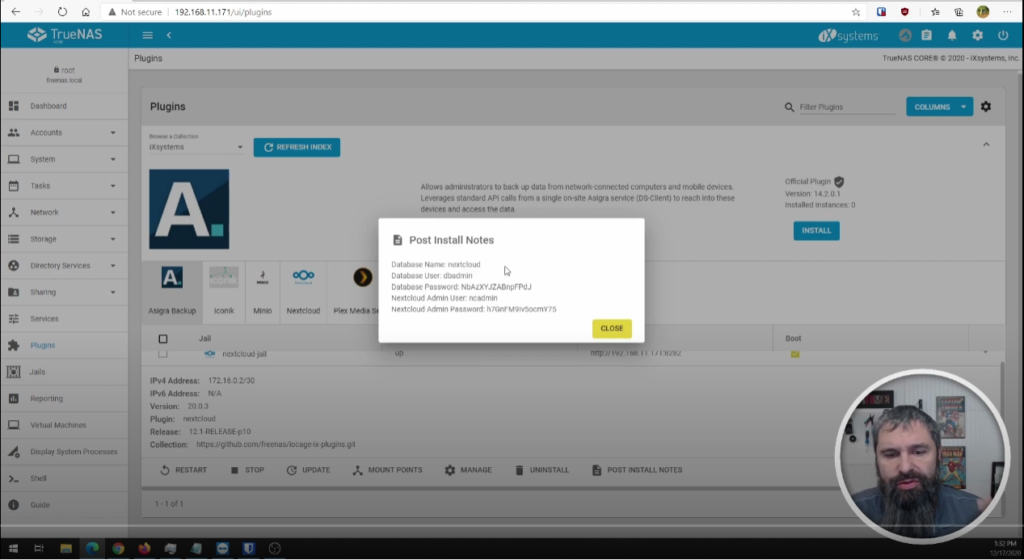
Now that it is installed click on post install notes which will give your database info including the user and password. You can now test the login information for your nextcloud. You should be able to see the files stored.
Now we will begin some prep, swap over to portainer. Go to stacks and then click add stack and paste this into it.
version: '2'
services:
  app:
    image: 'jc21/nginx-proxy-manager:latest'
    ports:
      - '80:80'
      - '81:81'
      - '443:443'
    environment:
      DB_MYSQL_HOST: "db"
      DB_MYSQL_PORT: 3306
      DB_MYSQL_USER: "npm"
      DB_MYSQL_PASSWORD: "npm"
      DB_MYSQL_NAME: "npm"
    volumes:
      - ./data:/data
      - ./letsencrypt:/etc/letsencrypt
  db:
    image: 'jc21/mariadb-aria:10.4'
    environment:
      MYSQL_ROOT_PASSWORD: 'npm'
      MYSQL_DATABASE: 'npm'
      MYSQL_USER: 'npm'
      MYSQL_PASSWORD: 'npm'
    volumes:
      - ./data/mysql:/var/lib/mysql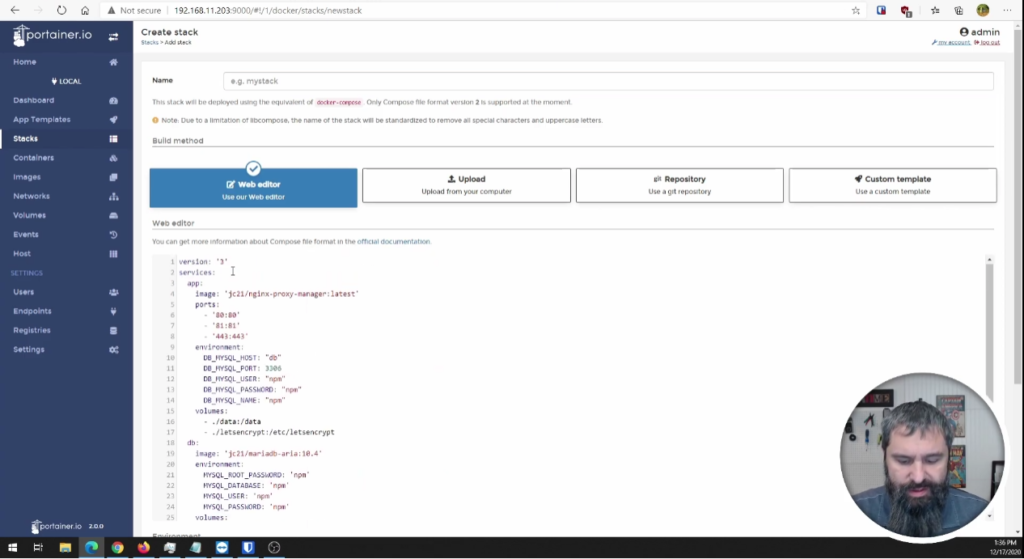
You will want to change the info under db when you are not doing it for test purposes. After you are finished click deploy. Now if you go over to the management stack and input the ip address with the port it will take you to your nginx login page.
The default admin user is:
Email: admin@example.com
Password: changeme
First thing it will do is have you update the user. Make sure to make it super secure, and now we have our basic proxy manager setup.
Go back to your TrueNAS, go to jails and you will find a nextcloud jail that was created.

Click on the jail and click on the shell. You could ssh into these but I find it easier this way. I am not a fan of vi so we are going to install nano and opening the config with nano:
pkg update

pkg install nano

cd /usr/local/www/nextcloud/config/

nano config.php
First thing we need to trust a domain which I have created a domain and add it in as following in the picture. Next we will add a trusted proxy which is also included in the picture which the ip address is the same as your proxy manager. Ctrl + X will exit nano and ask if you want to save, yes.

Go back to your proxy manager, click on proxyhosts. There will be no host so click add proxy host. Type your domain name in, next you will want to grab your nextcloud ip and add your nextcloud port. Select Websockets Support.
Next select SSL, under SSL Certificate select Request a new SSL Certificate. Select HTTP/2 Support, Force SSL. Set email address and agree to ToS and Save. If you are going to run this long term then you will want to enable HSTS. Then click on your host, you should be at the login screen after.

To get your login you will want to go back to plugins in your TrueNAS, click on the nextcloud-jail. Select Post Install Notes and it will have your user and password. Then you will be finished.
The important thing now is that you are running your nextcloud instance securely using https with a valid lets encrypt cert.
If you are having any trouble figuring this out, try to follow my video while you do it for a better visual guidance.